Intro
ProCoin WordPress Theme
- Features: WordPress, HTML5, CSS3, Multi-purpose, Revolution slider, Custom colors
- Type: WordPress Theme
- Created: 14/06/2018
- By: AnpsThemes
- Support: anpsthemes.freshdesk.com
Hello! First of all we would like to thank you for purchasing our theme! :) If you have any questions that are beyond the scope of this help file, please feel free to send your question on anpsthemes.freshdesk.com
This file will teach you how to set up and use our theme.
This file is really extensive so you might think the theme is hard to use, actually it's not, you probably just might jump in the code and explore everything yourself, this file is more of a reference work if you do not know what to do.
Have fun using our theme!
Best regards,
AnpsThemesJump start
If you want to set the theme up and running as quickly as possible, follow the below steps:
- Create a fresh installation of WordPress
- Upload the theme inside the WordPress dashboard: Appearance -> Themes -> Add New -> Upload Theme
- When you activate the theme, a notice will appear to install recommended and required plugins. Click on "Begin installing plugins" inside the notice or go to Appearance -> Install Plugins to install them.
- After the plugins are installed, navigate to Appearance - Theme options -> Dummy Content and install your preferred demo.
- Demo install will take some time to complete. After it is done, you can start editing the content and replacing the placeholder images with your own.
Theme Options
Inside Theme Options you can change almost everything. From font styles to page layout. Easily change or adjust font-sizes, colors, breadcrumbs, mobile layout, menu and footer.
Theme options are available inside the WordPress dashboard in Appearance → Theme Options.
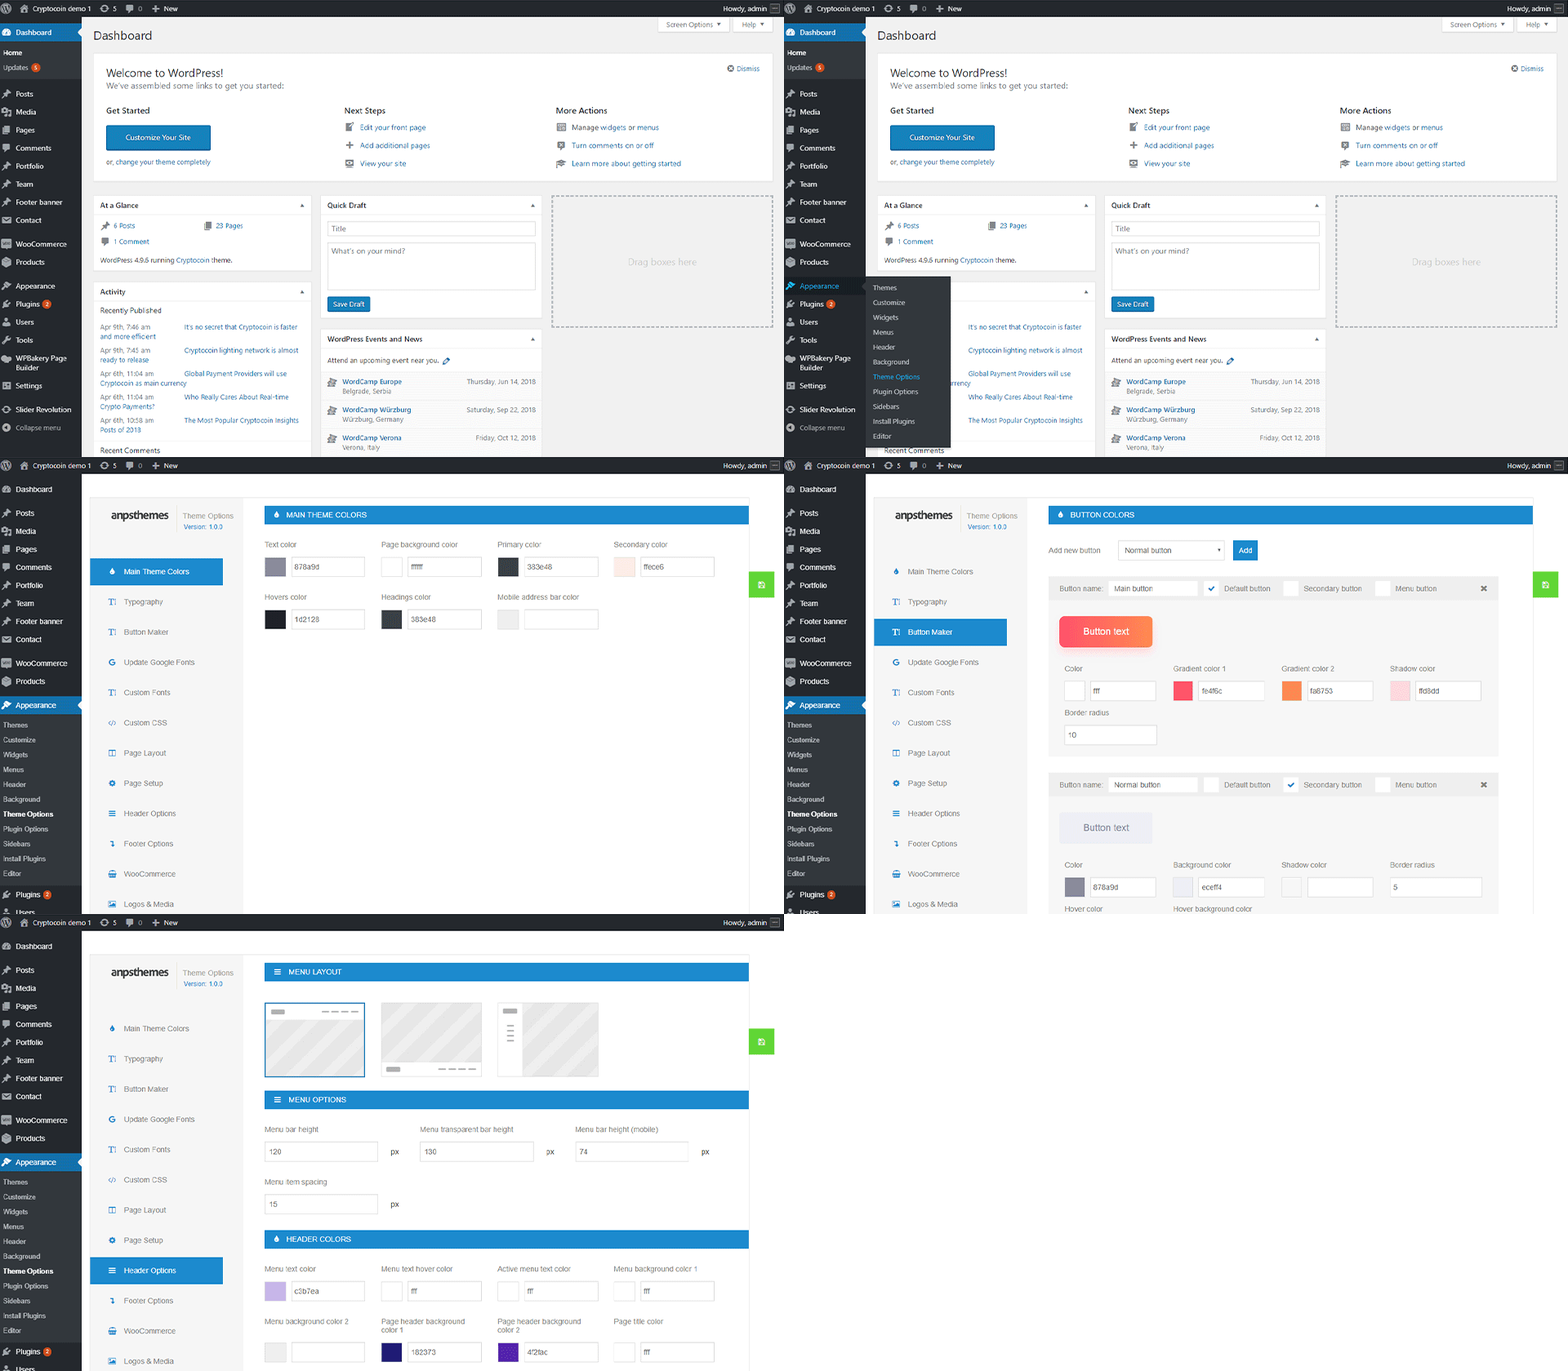
Main Theme Colors
This section includes some of most common colors. Other colors are available in the sections they relate to. For example the colors for the menu can be found in Appearance -> Header Options.
You can set colors by typing in the HEX values or by clicking on the colored box, which will open interactive color picker.

Text color will change the color of the content text.
Page background color will change the background color on all pages.
Primary color this color is set on a number of elements and is used to add more details or importance to the element.
Secondary color is used for backgrounds on elements.
Hovers Color applies to all hover states.
Headings Color applies to heading across the site.
Mobile address bar color changes the address bar color on mobile browsers.
Typography
Font family
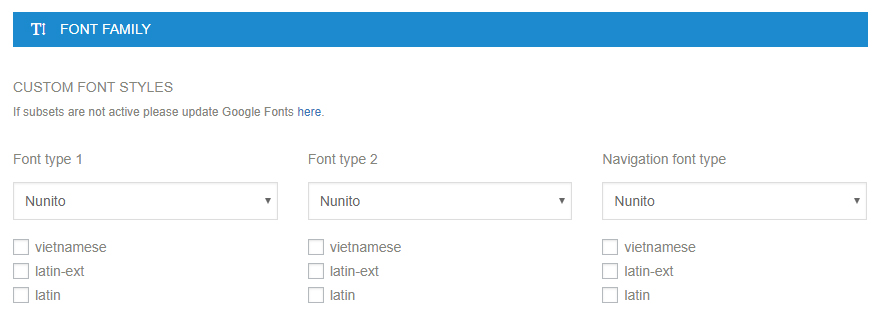
Specify three font types:
- Font type 1: used for headings (we used Montserrat on our demo site, which is a font that is included inside the fonts folder)
- Font type 2: used as the main body font (we used PT Sans on our demo site)
- Navigation font type used in main navigation (we used Montserrat on our demo site)
Below the Font Family you can also specify the subsets of character encoding for that specific font family. Character subsets varies from font to font (i.e. PT Sans supports Latin, Latin-ext, Cyrillic and Cyrillic-ext meanwhile Montserrat only supports latin).
Character subset will automatically refresh when you select a different font family.If you chose a Font, but it doesn't show some of the characters as it should chances are that this font family doesn't support the desired character subset and you should find one that does.
Since many of our fonts are included from Google Fonts, you can easily search for your perfect font by filtering the results based on the desired character subset on Google Fonts website.
When selecting a font family you will be able to choose a font from three groups:
- System Fonts: here you can find all of the basic fonts, from Times New Roman to Comic Sans.
- Custom Fonts: here you will find all of the fonts you upload to the theme. See Upload Custom Fonts section for more details.
- Google Fonts: Our theme supports 600+ google fonts, so you have the freedom to choose whatever font you would like, but be aware that our theme uses certain font weights that may not work good with certain font families. Note that Google keeps adding new fonts, so see Update Google Fonts section for more information.
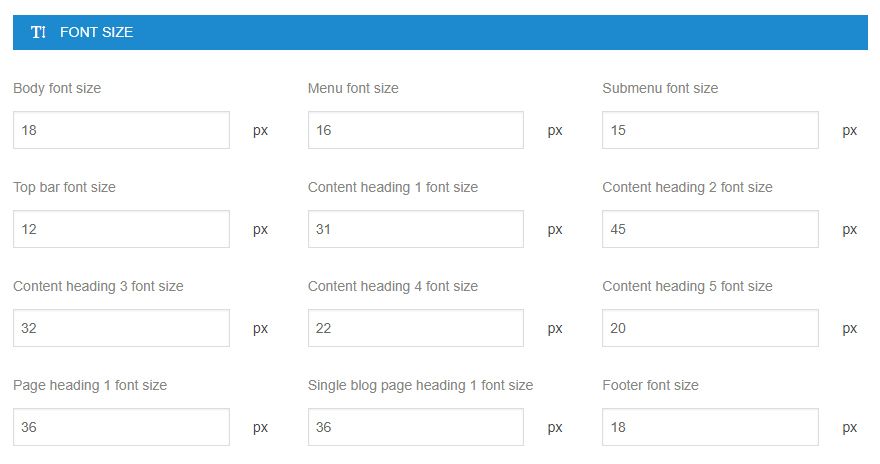
Font sizes
For fine control over theme's typography, it is possible to adjust used font sizes for:
- Body font size: changes the font size for the content text.
- Menu font size: changes the font size for the main menu (navigation).
- Submenu font size: changes the font size for the drop down menu links.
- Content headings (from h1 to h5): these options change the font size for headings and titles (ranging from h1 to h5)
- Page heading: changes the font size of the main title (inside page header) on pages
- Single blog page heading: changes the font size of the main title (inside page header) on blog posts
- Footer font size: changes the font size inside the footer
- Copyright font size: changes the font size inside the copyright
Adjust the font-size to your desires by entering new value in the input. After that click Save Changes button at the bottom of the Theme Options panel.
Button Maker
Here you can create your own buttons, which you can then use across your site.
When creating a new button you can choose 4 button types:
- Normal button
- Gradient background button
- Text only button
- Border button
Each button type offers different styling options you can change.
Once the button is created, you can also set it as the "Default" (appears in most cases a button is shown), "Secondary" (appears when multiple buttons are present or indicates a less important action) and/or "Menu" (appears in the menu bar) button.
Update Google Fonts
At the initial theme installation no fonts will be added so you will need to import them by pressing Update Google Fonts in this section. Note that the process might take a while, as there are quite a lot of font families that need to be imported.
If in the future you will see a new Google Font and would like to use it on your site, then import the fonts again by pressing Update Google fonts.

Custom Fonts
This section allows you to add new font families. The fonts can be easily added by selecting a .zip file (you need to provide more than just one font file type, so that all browser will be able to use you font) and pressing Save all changes.

Custom CSS
This section is intended for front end developers. Custom CSS section enables you to customize your site beyond theme options. Learning CSS is easy as it is not an advanced programming language. Most of the style customization can be achieved with CSS. Using tools like Firebug or browser native developer tools will help you to search for the CSS rulesets, which you can change to your liking and paste the CSS code to the custom CSS section of theme options. For learning CSS there are many resources on the web. You can start here: MDN web docs.
Page Layout
Inside Page Layout you will find options for managing page layout like boxed layout, default sidebars on pages and posts, page titles, breadcrumbs and background (Page Heading), you can enable page comments here for pages and set the blog layout.
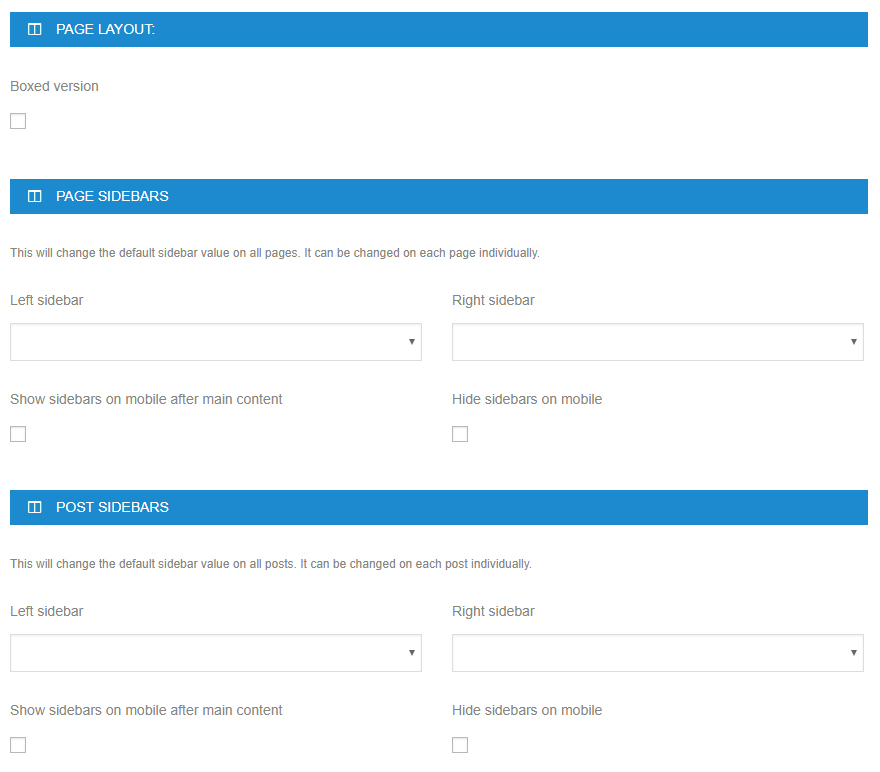
Boxed
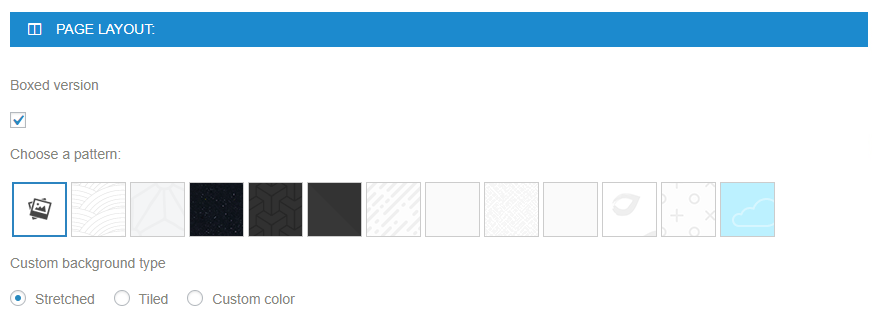
The default value for the page layout is Full Layout, but you can also select the Boxed version.
Once you check the Boxed version you will be able to choose from 12 predefined patterns or a custom background, which you can set to either a stretched, tiled image or solid color.
Tiled option is best used for adding custom patterns.
Page sidebars
This will change the default left and right sidebar value on all pages. Sidebar can still be overwritten on each page individually.
You also have the option to place the sidebars after the content or hide them entirely.
Post sidebars
This will change the default left and right sidebar value on all posts. Sidebar can still be overwritten on each post individually.
You also have the option to place the sidebars after the content or hide them entirely.
Page header
Page header is located below the menu on all pages and posts except the home page.
You can set the styling, height and divider of the page header. There is also an option to disable the header and/or breadcrumbs.
Page header particles add an animation effect to the background (see our demo).
Desktop container width
This option set the width of the site when viewing the on a large screen device. For other screen sizes, the site will fit the the screen with the predefined sizes.
Main content
Set a global spacing on the top and bottom the pages.
Page comments
Here you can enable/disable comments on pages.
Blog layout
Here you can manage default layout and style for blog/category/tag/archive pages.
Visual Composer
Set the default responsive class for WPBakery Page Builder.
Page Setup
Here you can set up 404 page, excerpt length, Portfolio style and slug, mangae display of meta data like categories, author, tags and date on archive pages and single posts.
Home page slider shortcode
If want to use a full width slider and a page with a sidebar. This will place the slider above the content, which will allow you to have such a layout.
404 error page
When user visits an url on your site which does not exists in the database, error page is displayed. Here, you can set which page is displayed in this case.
Simply select a page from a drop down of already added pages, which will be displayed on 404 errors.
Excerpt length
Default excerpt length is set to 40 characters. You can change this value if you want to change default excerpt length on archive pages.
Portfolio slug
Default slug in url is portfolio, here you can change it to any other word.
Portfolio Single Style
Portfolio single is specific page for each item in your portfolio. This page is meant to describe your project, product or service more thoroughly, with plenty of pictures and content.
Changing portfolio single style will apply to all portfolio single pages.
There are two types of Portfolio Single Styles.
- Style 1: Big images in the first column on the left and content in the second column on the right.
- Images that are displayed in the first column insert inside WP admin panel with the "Gallery Images" panel on your right.
- Style 2: Slider on the top with content below.
- Images that are displayed above the content in slider insert with the "Gallery Images" panel on your right.
For creating Portfolio Posts please refer to Adding Portfolio Posts
Team
Default slug in url is team, here you can change it to any other word.
Team single page
Enable or disable the team member page.
Post meta on blog / categories / tag / archive pages
In this section you can set what post meta data you want to be displayed. Just add a checkmark next to the Comments, Categories, Author and Date, if you want to display them.
Post meta on single post
In this section you can set what post meta data you want to be displayed. Just add a checkmark next to the Comments, Categories, Author, Date and Tags, if you want to display them.
Header Options
Here you can set all the options and colors related to the header and menu.
Menu layout
Select the menu layout type. You can choose from:
- top (default): the menu bar is horizontally positioned at the top of the screen.
- bottom: the menu bar is horizontally positioned at the bottom of the screen. We recommend using it with a full screen slider.
- vertical: the menu bar is vertically position on the left side of the screen.
Menu options
Set the height of the menu bar (default, transparent and for mobile).
You can also set the spacing between menu links.
Header colors
Here you can set all the main header colors.
Transparent options
If you enabled the "transparent header on home page" option, the menu bar will be positioned on top of the page content. We recommend using an element like the slider for the 1st element on the page so the content is not obstructed by the menu.
You can also overwrite all the colors, so you can have different colors for the menu for the transparent menu version.
Sticky menu options
If sticky menu is enabled, the menu will be "stuck" on the top of the screen even after the user scrolls down the page.
You can enabled the sticky menu for just the desktop screens or both for desktop and mobile.
You can also overwrite all the colors, so you can have a different colored sticky bar than the normal menu bar.
Menu button options
If enabled, a button will be added next to the menu. The button style can be selected in Appearance -> Theme Options -> Button Maker.
Top bar options
Top bar is located above the menu bar and can contain widgets. The widgets can be added in Appearance -> Widgets.
You can enable or disable the top bar and control the top bar height.
Other header options
Full width header
If enabled, the menu bar content will stretch across the entire screen (will not be positioned inside the container).
Display search options
Enabled/disable the site search.
Enable menu walker
Disable this option if you want to use a mega menu plugin.
Menu shadow
Display a shadow below the menu bar.
Footer Options
In this section you can set various options, which control the layout and display of the footer.
Footer banner
This option will set a global footer banner, which appears right above the site footer. The footer banners can be set under the "Footer banner" post type. This is useful if you want to have a call to action or similar element positioned at the end of every page.
You can set the footer banner on only certain pages by editing the specific page and changing the "footer banner" option.
Footer
Here you can enable or disable footer.
Further you can choose footer style. You can set how many columns do you want displayed in footer.
After you've set the columns, you can add widgets to footer sidebars in Appearance -> Widgets.
Footer colors
This part contains all the available colors for the main footer and copyright footer.
WooCommerce
This section contains all the theme related WooCommerce options. The options only work if have WooCommerce installed. All the main WooCommerce options are located in the WooCommerce -> Settings section.
Display shopping cart icon in header?
You can define here if you want the mini cart to be displayed in main menu. You can choose among three options:
- Never display
- WooCommerce pages
- Display everywhere
The second option will display the cart only on WooCommerce related pages, such as product page or shop page,...
The last option will display cart on every page.How many products in column?
Here you can choose the number of products displayed in one row on a shop page. This option allows you to choose between 3 or 4 products in one row.
Products per page
The number of products shown on each page on the WooCommerce shop page.
Product image zoom
If enabled, the user will be able to zoom in the main product image by hovering over the image.
Product image lightbox
If enabled, a button will be shown above the main product image which will allow the user to see a larger version of the image.
Logos and Media
In this section you can set different logos and their size (height).
Logo
This is the general logo. If you have only one version of your logo, you don't need to upload any other logos to the page. After general logo is defined, it will be used everywhere.
For fine control over which logo appears in which case, there are additional logo options.
Logo height
By default the logo size will not be limited. You can set a specific size to limit the logo size.
Front page logo
You can specify logo for front page only. This is useful if you have slider on the front page and header is set to transparent. In this case the general logo might not be perfect in terms of contrast.
Sticky logo
Sticky logo appears in sticky menu.
Transparent Sticky logo
Transparent sticky logo appears on sticky menu, if it is set to transparent header.
Mobile logo
This logo will appear on mobile devices. If no specific logo is defined, the general logo will be displayed.
Front page mobile logo
This logo will appear on mobile devices when the transparent menu option is set.
Page heading background
This will add an image as the background of the page header element.
Favicon
The icon which displays in the top left of the address bar or tab.
Home screen icon
The icon which displays if the user adds your site to their home screen.
Text based logo
If you don't want to use an image as the logo, you can use text instead.
Logos can be also defined on every page separately. If the logo is defined on a specific page, than this setting will override settings in theme options.
Dummy Content
Importing demo content with one click dummy content import is the fastest way to get you started with your new theme. After importing the demo, you just change images and text. You can also learn how to setup the pages from these examples.
How to import Dummy Content
Note: install and activate all of the required plugins (WPBakery Page Builder, Revolution Slider, Contact Form 7 etc before importing demo content.).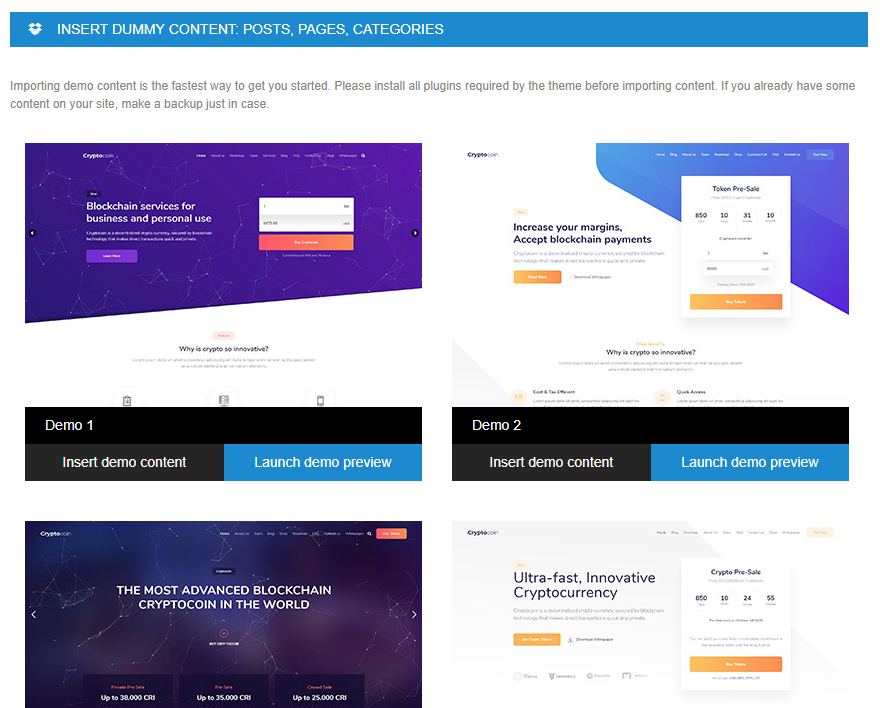
Important: If you are having trouble inserting dummy content and are receiving server errors, you will probably need to set your file permissions on folder wp-content/uploads ( if you don't have the folder, create it manually and set the permissions only on this folder ).
Automatic installation (inside Theme Options):
Manual installation (with WordPress Importer):
Installing the WordPress Importer:
- Step 1: Visit Tools → Import in the WordPress dashboard

- Step 2: Click on the WordPress link in the list of importers

- Step 3: Click "Install Now"
- Step 4: Finally click "Activate Plugin & Run Importer"
In our theme files you will find a .xml file (under anps-framework/classes/importer/dummy.xml). Use that file in the next step where it says: "Choose a WXR (.xml) file to upload, then click Upload file and import." and click on Upload file and import. In the next step you need to assign all the posts/page to a existing user or create a new user. In this step also be sure to have the Download and import file attachments checked, then click on the Submit button and you are done!
Important: Please note that theme options, widgets, slider won't be installed!
Theme Update
We tend to release upgrades of our themes quite a lot. Upgrades usually bring new features and fixes. By using Envato Market WordPress Plugin can automate the upgrade procedure.
Read more about Theme Upgrade under Upgrading the Theme.
If you are customizing the theme and you are changing the theme files, we suggest creating a child theme. Using child themes for customization enables safe upgrading of your theme in the future, without loosing any of custom changes.
Import/Export
This section allows you to import or export only the theme options configuration.
Import/export widgets
This section allows you to import or export the widgets.
System Requirements
Here you can see the recommended server configuration values.
If you are on shared or similar hosting and don't have the access to this setting, than you will not be able to solve this by yourself. You will have to contact the hosting provider. Mostly they help when contacted with such request. If they agree to raise this limit, this is the best and least painful solution for the demo import problem.
Top bar
Top bar is located above the header menu bar and can contain widgets.
The widget can be added in Appearance -> Widgets.
Top bar options are available in Appearance - Theme Options - Header Options.

Customizer
You can also change some theme options settings in customizer. You can find it in Appearance -> Customize and than select Theme options. Everything saved in Customizer will be synchronized with theme options and vice versa. If you want to know more about theme options settings, you can read it under Theme options section.WPBakery Page Builder (formerly Visual Composer)
WPBakery Page Builder is a drag-and-drop builder that comes included with our theme.
Install WPBakery Page Builder
- Step 1: Go to "Plugins" inside WP Admin Panel.
- Step 2: Install and Activate WPBakery WPBakery Page Builder plugin.
- Step 3: Go to desired page inside "Pages → All Pages" or "Pages → Add New" if you wish to add a new page.
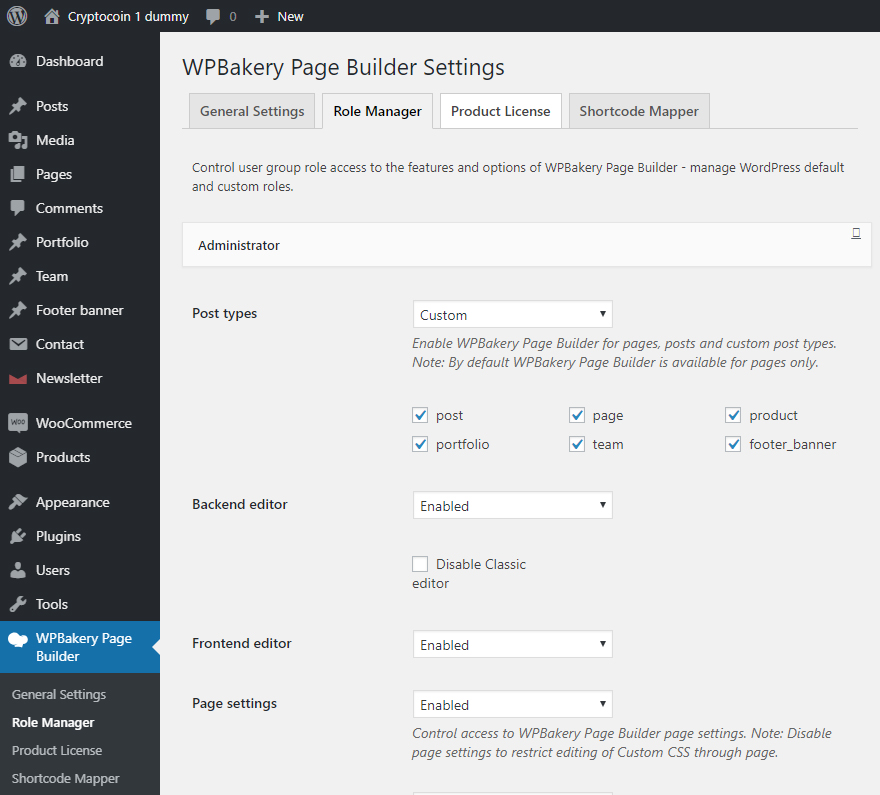
- Step 4: Click on the "Backend Editor" to enter the WPBakery Page Builder editor.

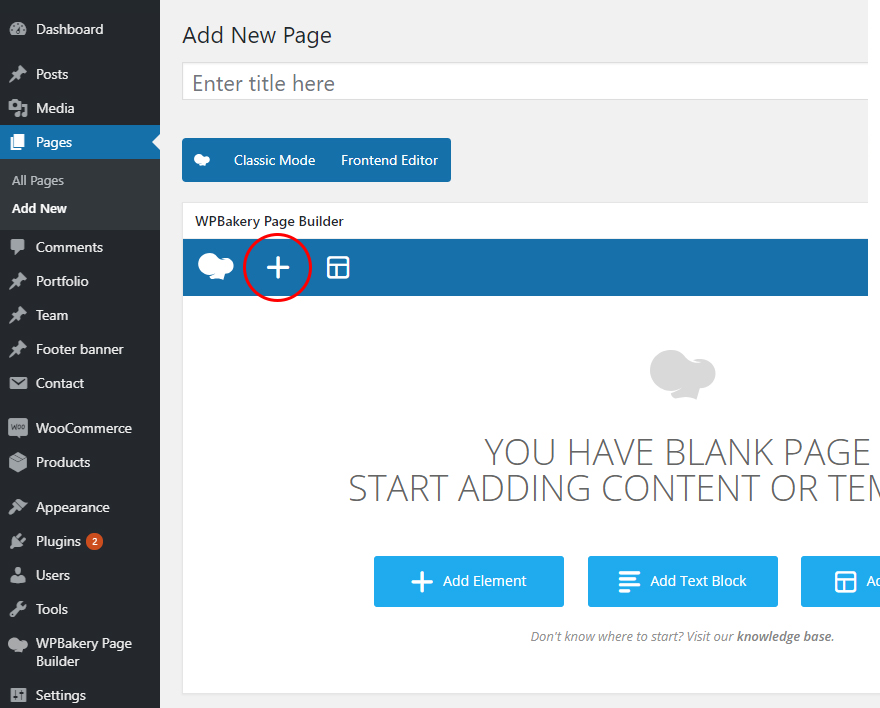
- Step 5: Click on the big "+" icon below the Page or Post title to add new element.
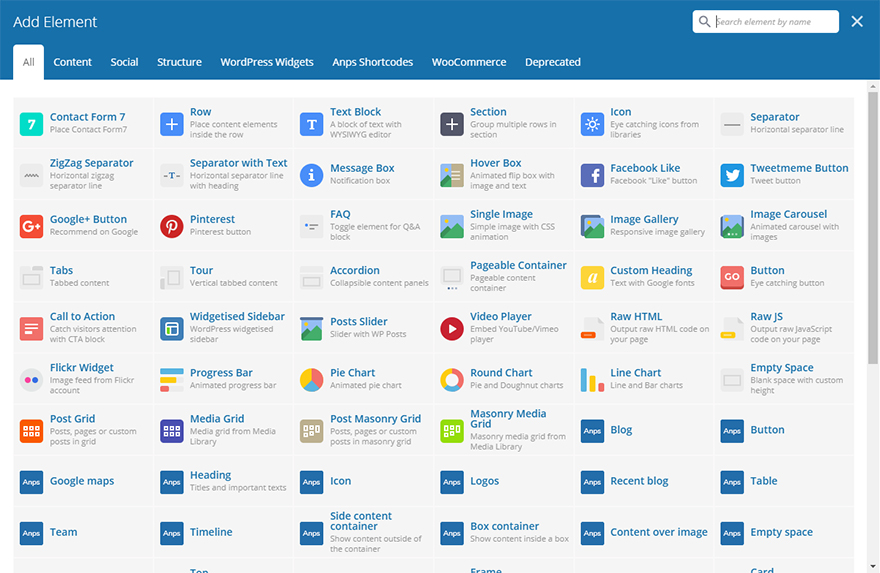
- Step 6: New window pops-up with wide range of different elements that are explained in the next chapter.
Adding Blog Posts
Adding Blog Posts with Wordpress
Here is a brief tutorial on how to create and publish new posts.
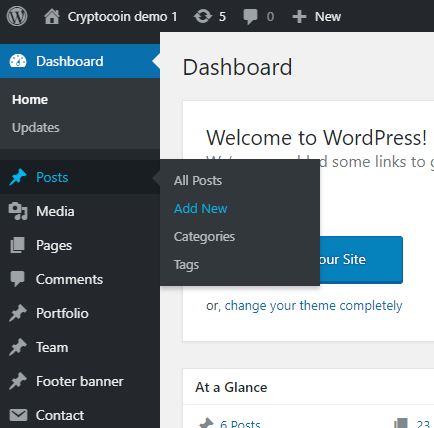
- Step 1: To add a post to your blog go to Posts → "Add New", at the right navigation menu in your Wordpress Admin Panel
- Step 2: Add a title of your post
- Step 3: Add content in the textarea below.
- Step 4: You can insert media content (images, videos) by clicking the "Add Media" button above the content textarea and below the title text field
- Step 5: You can choose to disable page heading or change page heading image and type of heading (i.e. fullscreen heading)
Note: this will override page heading settings set in Theme Options for this specific blog post.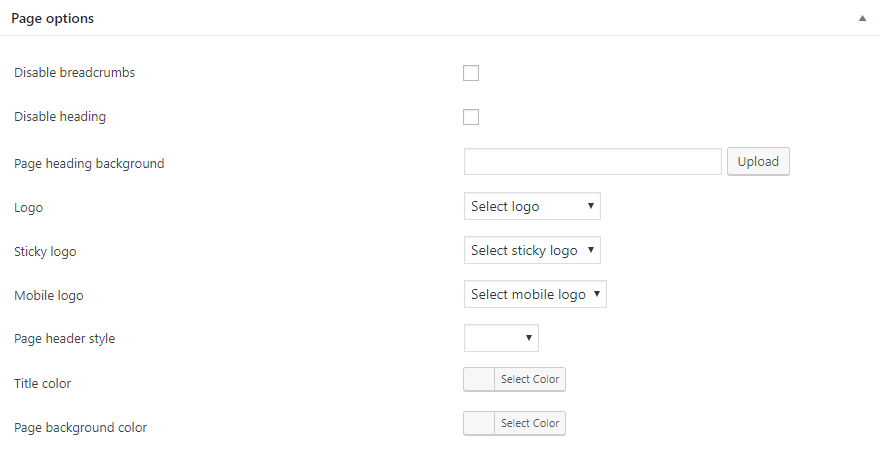
- Step 6: Assign categories for this specific blog post in the panel "Categories" on the right.
- Step 7: Choose the featured image for blog post in the panel "Featured Images" on the right. Featured image is displayed above the excerpt post of the blog post.
- Step 8: Click on the publish button to publish the blog post.

You can insert special content elements such as headings, buttons, google maps etc. by clicking on shortcodes dropdown. To add a post to your blog go to Posts → "Add New", at the right navigation menu in your Wordpress Admin Panel add post heading, post content, add Featured image and assign the desired categories. See more details on adding posts.
Adding images
Images can be placed inside the content by clicking the "Add Media" button. New window appears where you can set additional options, such as title of an image, description etc. you can also set the image size from three predefined sizes (thumbnail, medium and large) and image alignment (left, center or right).
This gallery images are displayed as a slider on the blog post page.
Adding Blog Posts with WPBakery Page Builder
- Step 1: To enable this feature go to "Settings" → "WPBakery Page Builder"
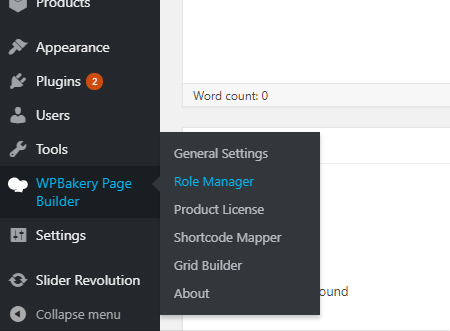
- Step 2: Check the "post" content type and click "Save Changes"
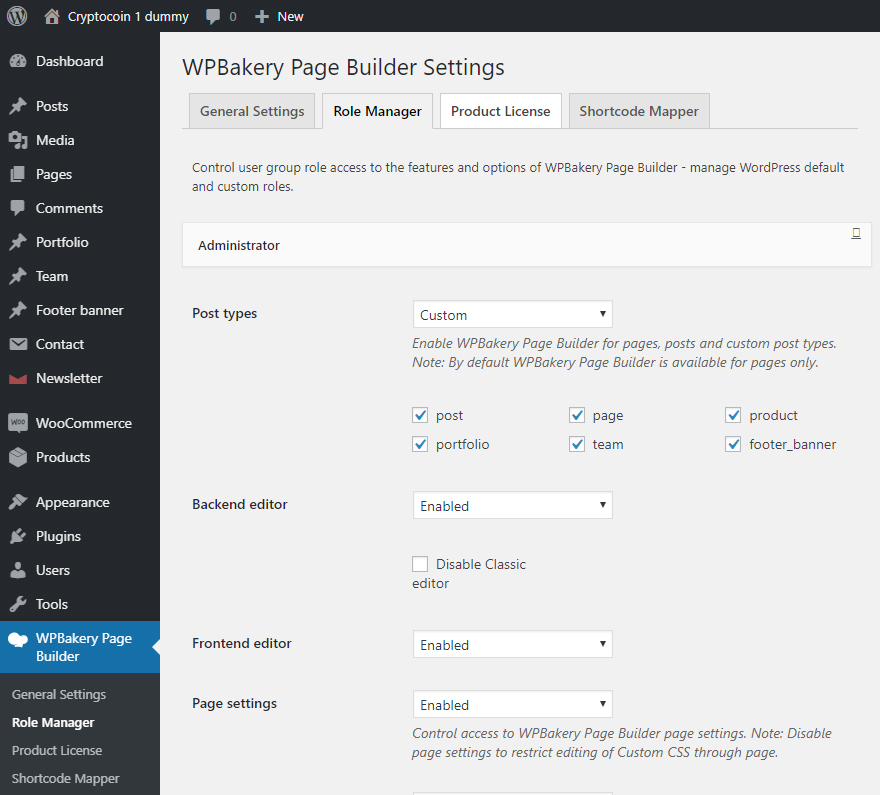
- Step 3: Click on the "Backend Editor" button on Blog Post Page inside WP admin panel (below the blog post title).

Inside VC Backend Editor you can easily drag-and-drop many of our custom elements (such as portfolio, team, recent blog, recent portfolio, quotes, icons, statements, accordions, testimonials, buttons, videos etc.)
On the image below you can see a custom blog page built with VC. Main Content is presented in a single column row and it consists of elements such as Single Image and Text Block. Text written below the image is caption.
Adding Portfolio Posts
Portfolio single item styles
There are two styles, that you can choose from in Theme Options.
- Portfolio Single Style 1 shows images normally in the left column and text in the right column.
- Portfolio Single Style 2 shows images in a carousel slider above the content.
Portfolio posts are meant for showcasing and describing your products, services, projects etc.
They are displayed in grid-like structure and when clicked more information about the project is revealed (goes to a portfolio item page).
- Sort Portfolio Posts by categories
- Portfolio Posts displayed in grid order. When hovered, title of portfolio appears and when clicked it takes you to the Portfolio Single Page.
- Portfolio Single Page is in this case using Portfolio Single Style 1.
- Step 1: Inside WP Admin Panel click on the "Portfolio" → "Add New".

- Step 2: Enter the Portfolio Item title
- Step 3: Insert the content in textarea below. You can insert shortcodes via in-built shortcode manager. Read more about shortcodes inside Shortcodes. You can also place content with WPBakery Page Builder Backend Editor. More on WPBakery Page Builder read here.
Note: enable WPBakery Page Builder backend editor by going to "Settings -> WPBakery Page Builder" and checking the portfolio option inside WP Admin panel. - Step 4: Enter a portfolio subtitle.

- Step 5: Define how the page heading will look like.
- Disable Page Heading: Check the box if you don't want to display the Page Heading.
- Page Heading Background: Upload an image for the background of the Page Heading.
- Full Screen Heading: Check the box if you want to have a full screen heading. If box is checked new options appear:
- Color top bar: Select a color for the top bar text color.
- Color menu, title and breadcrumbs: Select a color for the menu links, page heading title and breadcrumbs.
- Hover color: Select a color for hover states (when cursor is over the link).
- Logo: Choose a logo from the dropdown list. Upload a new Logo if needed by going to "Media -> Add New" in WP Admin Panel.
- Step 6: Assign categories for this specific portfolio post. This is applies to filtering purposes. (So that visitors can sort portfolio posts by category).
- Step 7: Add Gallery Images (on the right). Images added here will appear in the left column or above the content in the carousel. Depends on the set Portfolio Single Style which can be modified inside Theme Options -> General Settings -> Page Setup.
- Step 8: Add Featured Image (on the right). Added image will be displayed in Portfolio grid.
- Step 9: Click "Publish" or "Update".
This is an example of portfolio post page with Page Heading set to full screen and Portfolio Style set to Style one.
Sliders
Revolution slider
Our themes come included with Revolution Slider, which is one of best sliders available.
- Step 1: Install Revolution Slider by going to "Plugins" → "Revolution Slider" then click Install and Activate the plugin.
- Step 2: Go to "Revolution Slider" in the WP Admin Panel navigation.
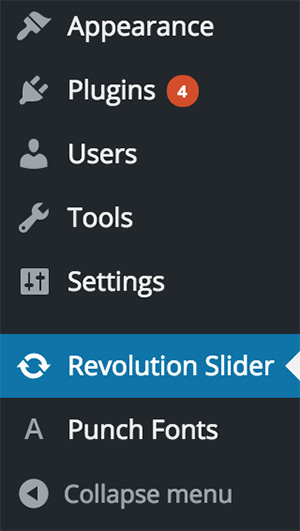
- Step 3: Click on the "Create New Slider" or click on the link to modify an existing one.

- Step 4: Fill out the Main Slider Settings, such as the slider title, layout, height and width properties. Adjust visual effects in panels on the right side.
- Step 5: Go to the page you want your slider to be shown.
- Step 6: Go to Backend Editor with WPBakery Page Builder and add new element by clicking "+" icon and add element "Revolution Slider"
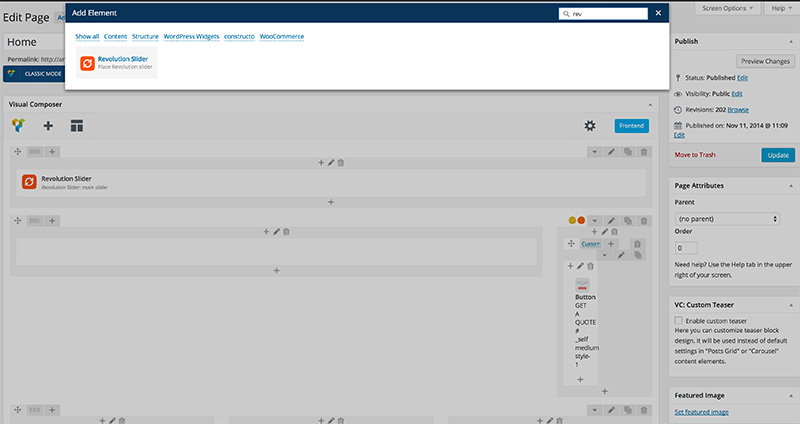
- Step 7: New window pops up. Choose desired slider setup from the menu.
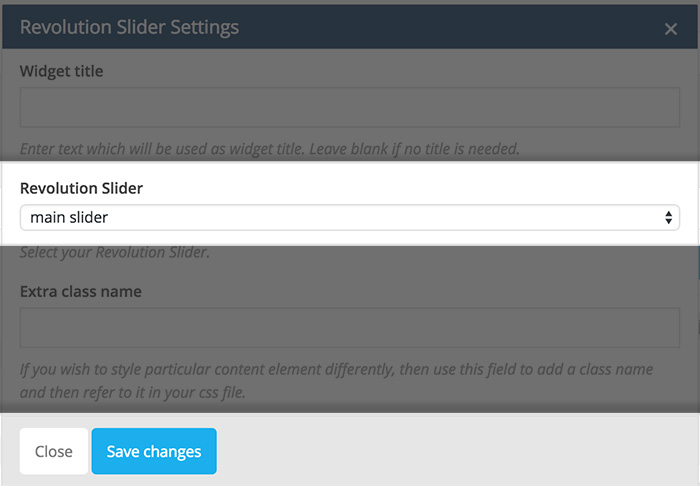
- Step 8: After clicking "Save Changes" you should see Revolution Slider element added to the page.
You can also copy the shortcode that is automatically generated anywhere in the text editor (WP or WPBakery Page Builder).
- Step 1: Copy the code inside Main Slider Settings ("Revolution Slider" → "Add New Slider" or click on the link of existing one).
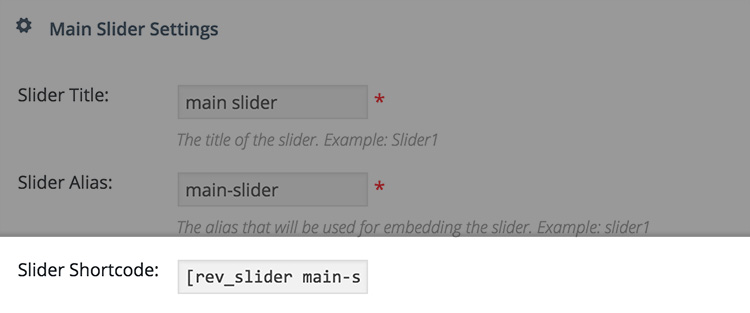
- Step 2: Paste the code anywhere in the text editor (WP built-in text editor or WPBakery Page Builder).
For more detailed information and support please refer to the official plugin website here.
Sidebars
Creating new Sidebar
- Step 1: Inside WP Admin Panel Go to "Appearance → Sidebars"
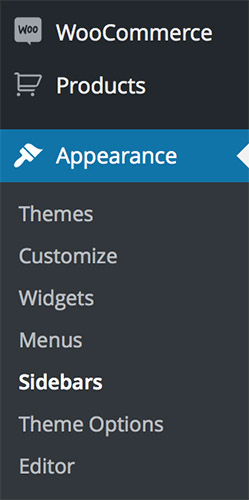
- Step 2: Click on the "+ Add Sidebar"

- Step 2: New window pops up. Insert Sidebar name.
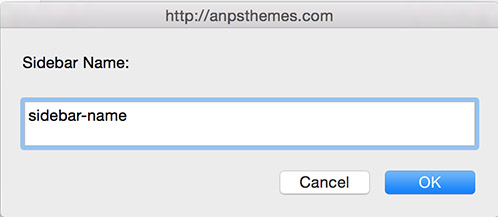
- Step 4: Click on the "OK" button. You should see your sidebar now added to the table.
You can add widgets to newly created sidebars by going to "Appearance → Widgets".
Adding a sidebar to a page or post
You can add a sidebar to all pages, except the portfolio page and single item portfolio page. You can add a sidebar to a page/post by selecting the desired by going to the desired item in WordPress (under Pages/Posts) and under the content editor you will see a box called Sidebars. You can select eiter only one of the sidebars, either both of them.
Important: Be carefull when adding two sidebars, because some elements aren't designed to be used with two sidebars ( two or more column sidebars ).
Adding a Sidebar
Translating the Theme
Our theme comes localisation ready out of the box.
There are several methods to create a translation, most of which are outlined in the codex (http://codex.WordPress.org/Translating_WordPress), however, we find the easiest method is to use a plugin called Loco Translate.
Translating with Loco Translate Plugin
The Loco Translate plugin provides in-browser editing of PO files used for localizing WordPress plugins and themes. Free Loco Translate Download
After installing the Loco Translate plugin you should see a new section added to your WP Admin Panel navigation area.
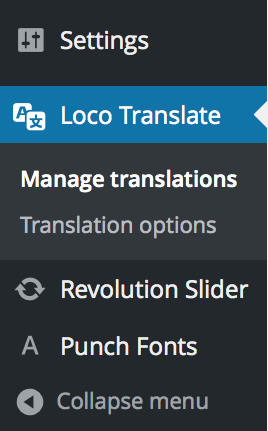
This is a step-by-step guide to translate your Theme with Loco Translate Plugin.
Choosing the Language
- Step 1: To translate your Theme, select the desired theme from the "Themes" area by clicking on the "New Language" button.
To modify an existing translation click on the link of that specific language.
- Step 2: Select a language in which you want to translate your Theme into. You can also specify language by inserting the language code into the text box located below.
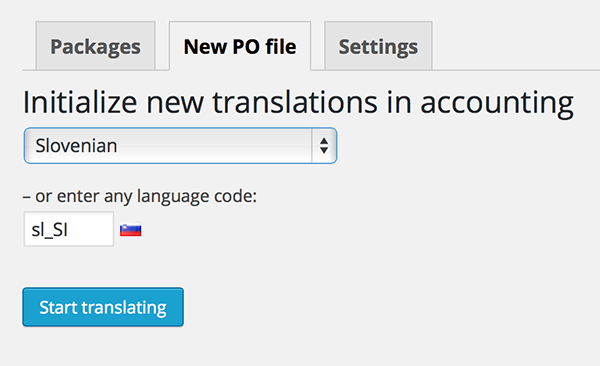
- Then click Start Translating.
Translating
- Step 3: We need to Sync our Theme with Loco Translate.
Click on the "Sync" button to synchronize.

- After clicking on the "Sync" button you will see a wide list of words inside the "Source Text" area.

- Step 4: Choose the word or a string you would like to translate by clicking on them. You can also filter the strings by using the "Filter Translation" input box above the "Source Text" area.
- Step 5: Type the translated version of a word or a string inside the "Language Version" area below "Source Text" area.
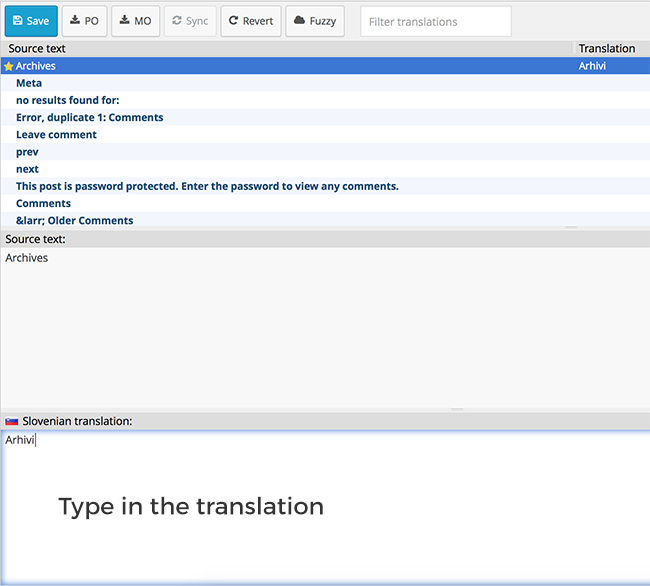
- Step 6: When finished translating click on the Save button located on top of the "Source Text" area.

You can revert the modifications by clicking on the "Revert" button. Note: you can't revert the changes when you have already saved the file.
After clicking the "Save" button your Theme will automatically be updated with the newly added translations.
For more detailed information please refer to the official plugin website
Updating the Theme
Before you update
Everytime we update a theme you will be notified by email message. We suggesst that you keep Theme up to date, as we fix bugs and add improvements.
Caution: Always backup your files before upgrading.
Updating using FTP
To update our theme, go to ThemeForest and download the newest version of our theme (you can check all of your purchased items under the Downloads tab).
- Step 1: Download the latest version from ThemeForest and unzip it
- Step 2: Log in to your server with FTP program and navigate to your WordPress installation -> wp-content -> themes
- Step 3: Delete (or just rename) your old Theme folder on server
- Step 4: Copy your new Theme folder to the server
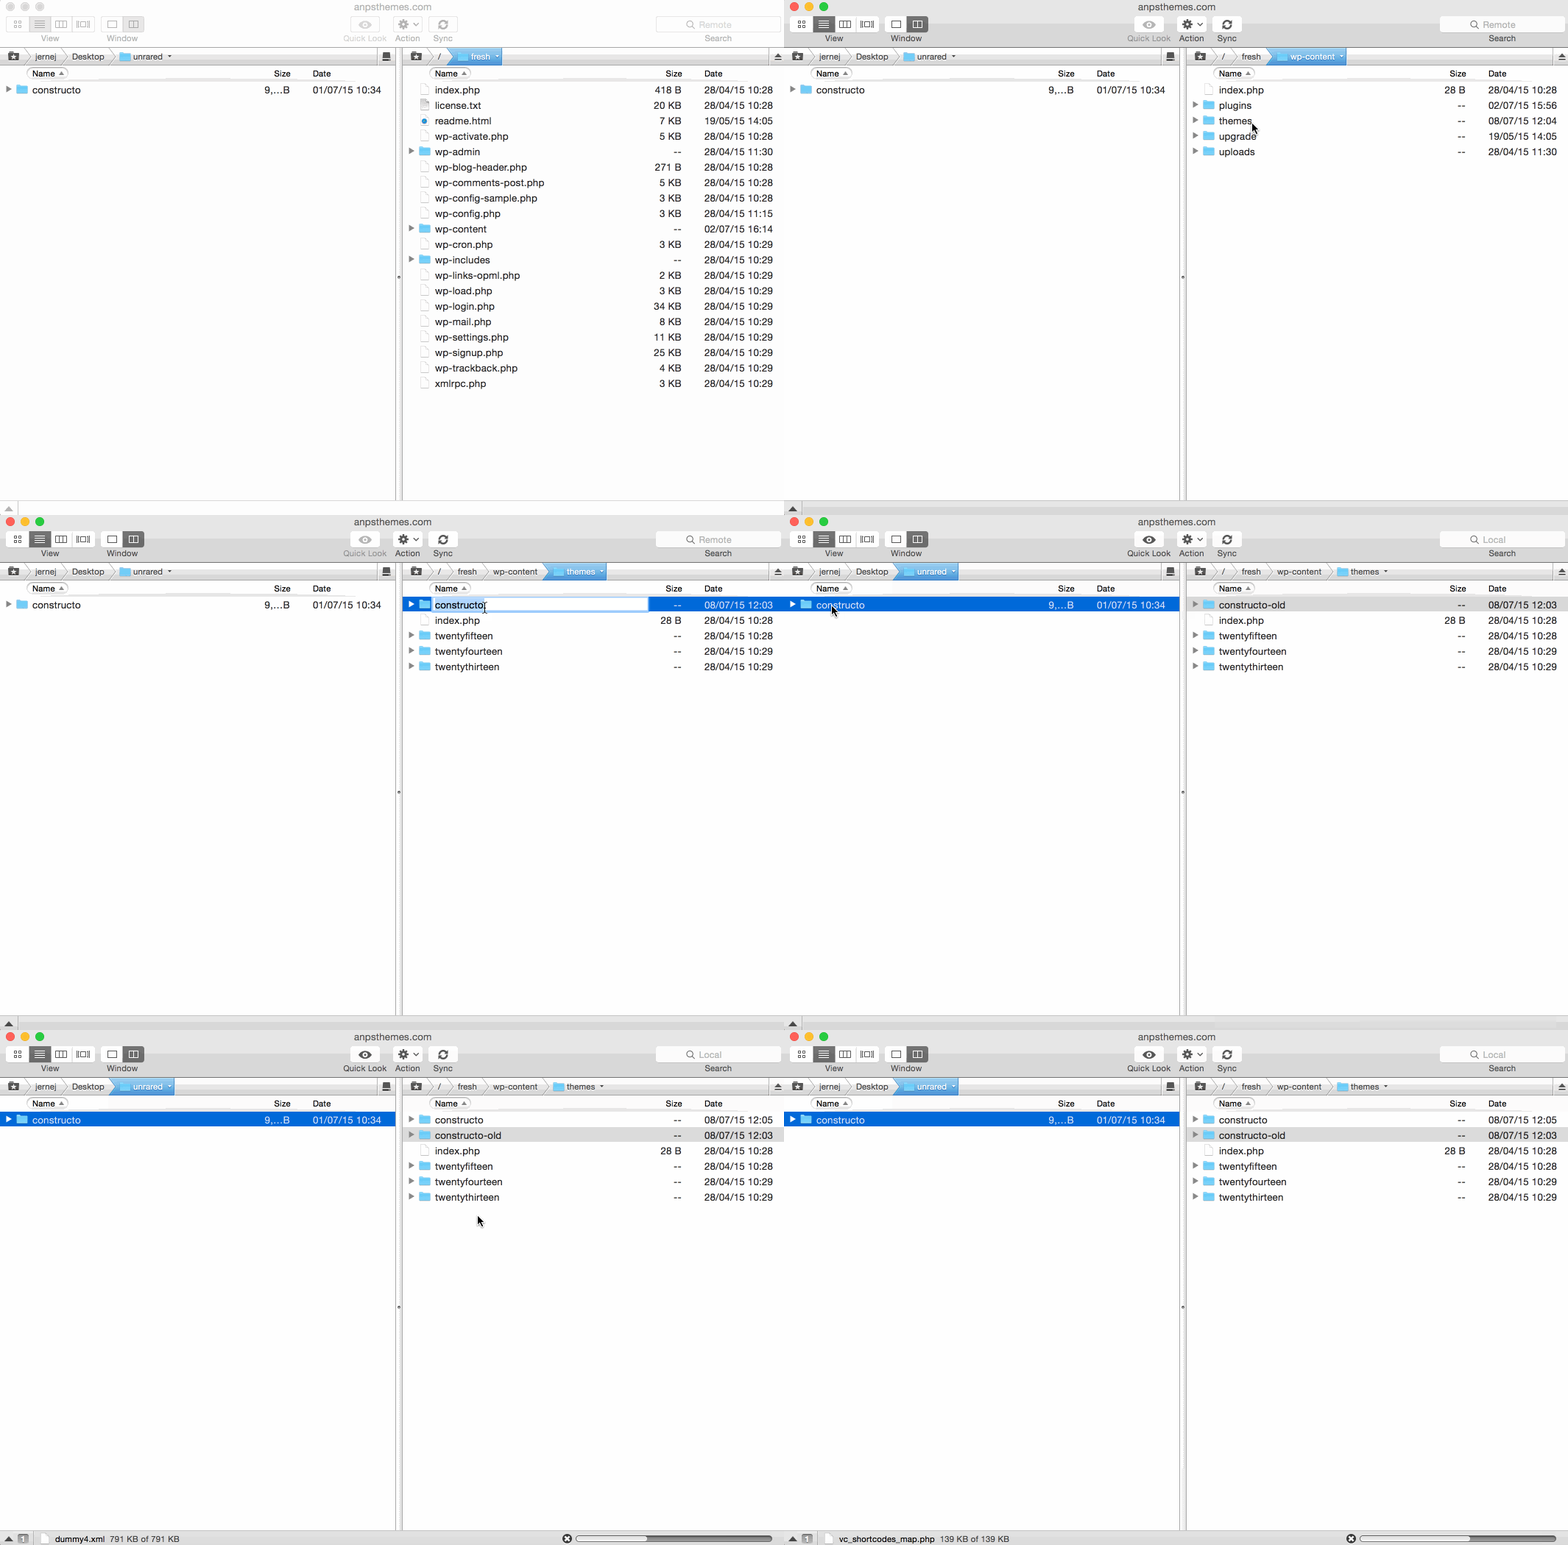
Some of the FTP programs available for uploading files to server are FileZilla and SmartFTP.
Please note: our theme cannot be updated via WordPress, so if you are promted to update the theme, please do not click on the update, as you may lose your files.
Updating Using Envato Market WordPress Plugin
Install the "Envato Market WordPress" plugin in Appearance -> Install Plugins or download the plugin from envato.com/market-plugin/.
To use the plugin, you will need to generate an API Token on build.envato.com
More information and documentation: envato.com/market-plugin.
Site Optimization
Slow website performance can be caused by different issues. Below are the 4 most common issues:
-
Plugins - Using multiple plugins on your site may effect your site performance. To quickly see if a plugin is slowing your site, disable all the plugins except for the ones that we included with our theme. If the site is running faster, then one of the plugins is the problem. To find out which one it is, activate one plugin at a time and test your site after each activation. If you find a plugin that is causing issues, please contact the plugin developer and report it to them.
-
Media Content - Images are the primary reason web pages are bloated and having unoptimized images can drastically slow down your site. Make sure not to upload larger images than you need to. Example: the image should not be larger then the column size in which the image is placed.
Also make sure the images are compressed/optimized. To do so, we recommend using an image editing tool like Photoshop and use the "Save For Web" feature to optimize images and reduce the overall file size.
-
W3 Total Cache - Using a caching plugin will definitely boost your site performance. We recommend using W3 Total Cache, because it has shown the most performance boosts on our themes. Check out this Tuts+ article. It starts by going over why using a caching plugin will help you and then dives into all the different options you need set, to make sure your site runs as fast as possible.
-
Hosting - Your site can only run as fast as your hosting allows it. This depends on which hosting provider and which hosting plan you have chosen. For example: using shared hosting can have an effect on speed. If you have not yet chosen a provider, please check forum and review sites to see which hosting will work best for you.
If you have tried all the performance tips and the site performance has not changed, we suggest you contact your host and discuss it with them.
Child Theme
A WordPress child theme is a theme that inherits the functionality of another theme, called the parent theme, and allows you to modify, or add to, the functionality of that parent theme. The whole idea of a child theme is that you can modify, and add to the functionality of that parent theme without modifying it directly. The parent remains intact, everything is built within the child theme.
Reasons to use child theme:
- Easy updates - If you’re using a child theme, you don’t have to worry about any updates. Whenever you update the theme, only the parent theme will be updated. Your child theme, and everything you’ve coded in it, remains intact.
- Changes - If you’re using a child theme, every modification can be found in the child theme’s folder and thus you can track all the changes you made very easily. To start using our child theme, then just activate the
Bootstrap
This theme has been built using Twitter Bootstrap. We did not use every aspect of it, but only include parts of it. For example, we have removed the default Glyphicons font icons and include Font Awesome instead.
If you want to use a feature of Bootstrap that we did not include, then go to assets/sass/bootstrap.scss and uncomment the import functions.
Many elements used in this theme are almost identical to Bootstrap components, so you check their documentation if you need extra help or check if they have extra functionality that is outside the scope of our theme.
Sources and Credits
