ShopBox - WooCommerce Theme by AnpsThemes
- Features: WordPress, WooCommerce, HTML5, CSS3
- Type: WordPress Theme
- Created: 22/01/2014
- By: AnpsThemes
- Version: 1.0
- Email: support@anpsthemes.com
Hello! First of all we would like to thank you for purchasing our theme! :) If you have any questions that are beyond the scope of this help file, please feel free to send your question on support@anpsthemes.com.
This file will teach you how to set up and use our theme.
This file is really extensive so you might think the theme is hard to use, actually its not, you probably just might jump to the options page and explore everything yourself, this file is more of a reference work if you do not know what to do, or if you are not familiar to WordPress.
Have fun using our theme!
Best regards,
Anps team
Installation
You can either choose to upload the theme to your server via FTP (only upload the unzipped theme folder into the folder wp-content/themes/) or via WordPress upload function. To use the upload function of the WordPress admin panel make sure to ONLY upload the main theme folder and not the whole archive file that you received from ThemeForest.
If you are new to WordPress and have problems with setting up the theme you might want to import the dummy content file that comes with the theme. You can import this file by clicking the "Insert dummy content" Button in the Appearance → Theme Options → Dummy Content. The theme will then import dummy posts and pages from the live preview (please note that you will not receive the images that we used on our demo site, as we are not the owners of them).
Beginner Resources
Theme Options
To visit the main theme options, either click on Theme Options in the admin bar (bellow the address bar) or go to Appearance → Theme Options.
Style Settings
Our template is design with customisation in mind! That means you can create a very unique website, with just setting our theme options.
Theme Style
You can change colors separately, but you can also choose one of our predefined color schemes, to either just use as your theme scheme or as a basis from which you can set colors as you wish.
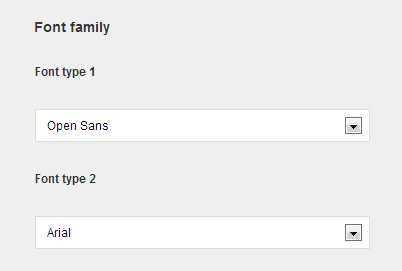
Font family
Here you can choose two font types:
- Font type 1: used for all of your content texts
- Font type 2: used for all headings and important texts
When selecting a font family you will be able to choose a font from three groups:
- System Fonts: here you can find all of the basic fonts, from Times New Roman to Comic Sans.
- Custom Fonts: under here you will find all of the fonts you upload to the theme. See Upload Custom Fonts section for more details.
- Google Fonts: Our theme supports 600+ google fonts, so you have the freedom to choose whatever font you would like, but be aware that our theme uses certain font weights that may not work good with certain font families. Note that Google keeps adding new fonts, so see Update Google Fonts section for more information.
Heading Sizes
Here you can set the font size for H1-H5 headings.
Predefined color Scheme
Here you can choose from predefined colors schemes. When you choose a color scheme, it will only fill in the options below, so you can still change any color, without editing the predefined colors.
Setting the colors
You can put in the HEX values for what color you would like, or you can click on the colored box, which will open our colorpicker.
General Settings
Page layout
Here you will find all of the theme layout settings, such as is the theme boxed, is responsive activated, etc.
Sticky menu
If this options is checked, then the main menu will stay visible even when you scroll down.
Responsive
Here you can turn on/off responsive option for template. That means if responsive option is turned off template won't adjust to other devices (mobile, tablets etc.). Responsive option is turn on by default.
Responsive on demand
Responsive on demand is an options that allows users to turn off responsive mode. The button to turn it off will show in the theme footer (arrow like icon).
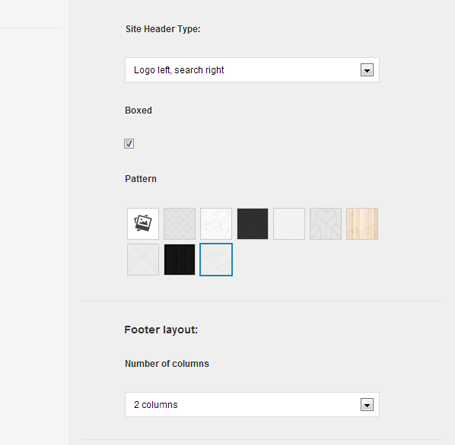
Site header
Here you can choose different header style options, just select prefered option in drop down menu and save.
Boxed
The default value for the page layout is Full layout, but you can also select the boxed version. Once you will select the boxed version you will be able to choose 9 patterns or a custom background, which you can set to either a streched or tilled image (tilled is best used for adding your own patterns) or you can pick a solid color.
Copyright footer
Here you can turn on/off the copyright footer and also set its content.
Footer layout
Footer layout is divided to columns, choose your option in drop down menu.
Page setup
On this page you can select which page will be used for the Blog page, Portfolio page, First page and error 404 page, while also setting some basic settings such as Blog layout style.
Blog layout
Portfolio page
Here you can choose which content your portfolio page should contain. Portfolio page has several options (pagination type, limit items and portfolio heading), which we will discuss now one by one.
Number of columns
You can choose between Full Width, 2 columns, 3 columns and 4 columns layout.
Filter
Check this option if you would like to include a filter for you portflio posts. Be sure to set categories for you portfolio posts.
Limit items per page
Enter a number for the maximum number of items to shows on each portfolio page. This value must be divisible by the number of columns for example:
- 2 column layout can have a limit of 2, 4, 6, 8, 10, 12 etc. items
- 3 column layout can have a limit of 3, 6, 9, 12, 15, 18, 21 etc. items
- 4 column layout can have a limit of 4, 8, 12, 16, 20, 24 etc. items
Social accounts
Here you can set all of your social accounts, including your email to which our contact form will send the emails.
Also note: you need to provide full URLs for the social accounts, not just account names.
Contact Form Options
From this tab you can easily create any kind of contact form you like. For each box you have 5 set of settings:
- Input type: Here you can select six values: Text, Textarea, Dropdown, Checkbox, Radio and Captcha.
- Required: If you check this field, then the user will have to write some information inside.
- Placeholder (text, textarea): This is the text that is shown inside of the box and disappeares when the user click on the box.
- Values (dropdown, checkbox, radio): The values for the dropdown element. Put each value in a separate line, you do not need to add commas or any character to separate the items.
- Validation: This is the validation type and you can choose None, Text, Number, Email and Phone Number (Can't be selected on dropdown).
You can add or delete fields by either clicking on the plus or the minus sign on the right side of each field. The new field will be added behind the field you clicked on.
Note: If you want the dropdown to be required, then add the first element blank, so no value is selected at the start.

Contact form admin area Dummy Content
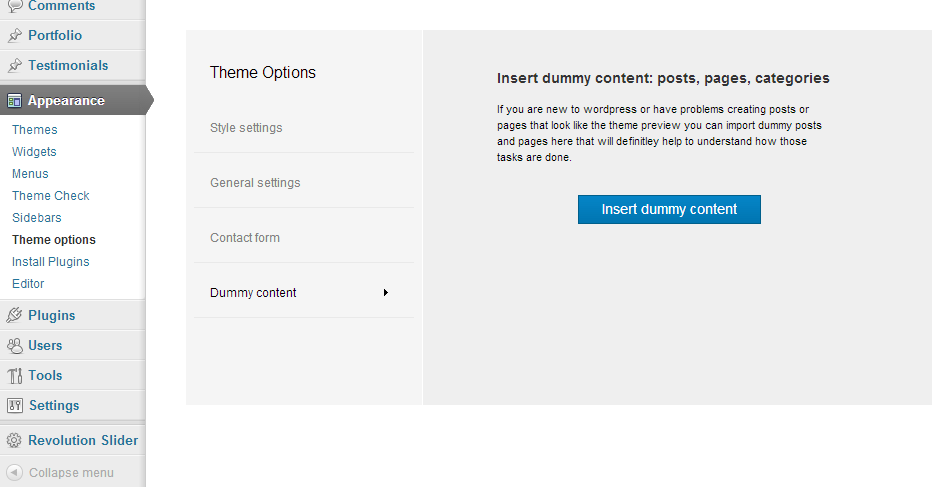
If you are new to WordPress or have problems creating posts or pages that look like the theme preview you can import dummy posts and pages here that will definitely help to understand how those tasks are done.
Important: Please make sure you have set your links to pretty link, so you won't receive any errors, check also menu description below.
Important: If you are having trouble inserting dummy content and are receiving server errors, you will probably need to set your file permissions on folder wp-content/uploads ( if you don't have the folder, create it manually and set the permissions only on this folder ).
If you don't want to set, can't or don't know how to set file permissions, you can download this .zip file and place it into wp-content folder.
Manual instalation ( with WordPress Importer ):
Installing the WordPress Importer:
- Visit Tools → Import in the WordPress dashboard
- Click on the WordPress link in the list of importers
- Click "Install Now"
- Finally click "Activate Plugin & Run Importer"
In our theme files you will find a .xml file (under anps-framework/classes/importer/dummy.xml). Use that file in the next step where it says: "Choose a WXR (.xml) file to upload, then click Upload file and import." and click on Upload file and import. In the next step you need to assign all the posts/page to a existing user or create a new user. In this step also be sure to have the Download and import file attachments checked, then click on the Submit button and you are done!
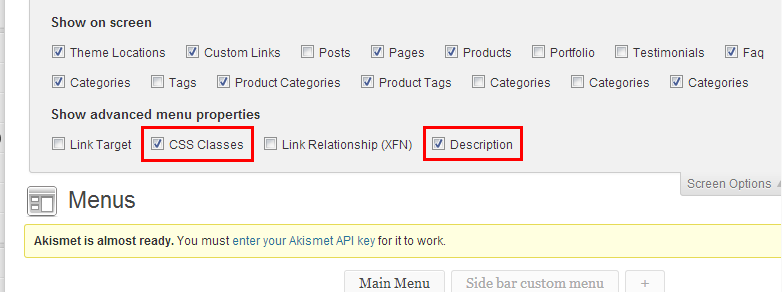
Megamenu
To create a megamenu you will first need to go to Appearance → Menus and open the Screen Options and checking the CSS Classes and Description options (you can also check the Product Categories if you intend to use them). Click on Save Menu to save the settings.
Then you need to assign a megamenu class to the parent element - the element at the top most of the structure (in the below examples this means to the Shop element).
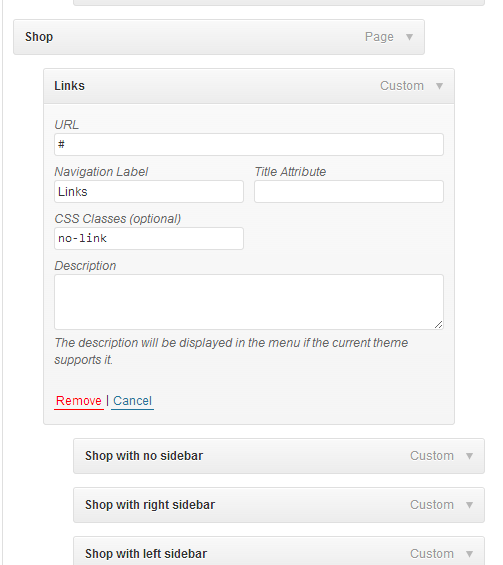
Adding links
To add a group of links, you need to first add a parent element that will contain the title.
When adding the parent element set the URL to "#", the Navigation Label to the desired title (in our example we named it Links) and assign a no-link class to it, so it changes it to a heading.
Adding Text
Create a new element and set the URL to "#", the Navigation Label to the desired title (in our example we named it Links), assign a no-link class to it, so it changes it to a heading and insert you text in the description area.
WooCommerce
Basics Settings
Create WooCommerce pages (you can solve this two different ways):- When prompted by WooCommerce click on Install WooCommerce Pages
- Create pages by yourself and insert the shortcodes for each page ([woocommerce_cart], [woocommerce_order_tracking], etc.). Once you have created them, go to WooCommerce → Settings → Pages and select each desired page for the settings.
Link to the extensive documentation: http://docs.woothemes.com/documentation/plugins/woocommerce/
WooCommerce Shortcodes
The full list of shortcodes can be found here: http://docs.woothemes.com/document/woocommerce-shortcodes/
Wishlist
We have added support for the plugin YITH WooCommerce Wishlist, which we have provided with our theme (we changed a few files, so please use the plugin provided with our theme). You just need to install the plugin, set the Wishlist page under WooCommerce - Settings - Pages and translate the plugin.
Full documentationCompare
We have added support for the plugin YITH WooCommerce Comapre, which we have provided with our theme (we changed a few files, so please use the plugin provided with our theme). You just need to install the plugin and translate a few words.
Full documentationAdding Blog Posts
To add a post to your blog go to Posts → Add New, then add post heading, post content, add Featured image and assign the desired categories. See more details on adding posts.
Adding a video to your Blog posts
You can also add videos inside of you Blog posts, via our shortcodes (YouTube or Vimeo), but you can also display a video on the first page as well.
All you need to do is to add a video within your content (if you have more than one video, it will show the first one), but don't select any Featured image because image override videos.
Adding a gallery of images to Blog posts
Adding a gallery is the same as adding the Featured image, but don't just select one image. You can add as many images as you like. Please note that you need to upload the images on the post itself, so WordPress assigns the images to the current post. You can also see in the Media section to which posts an image belongs to.
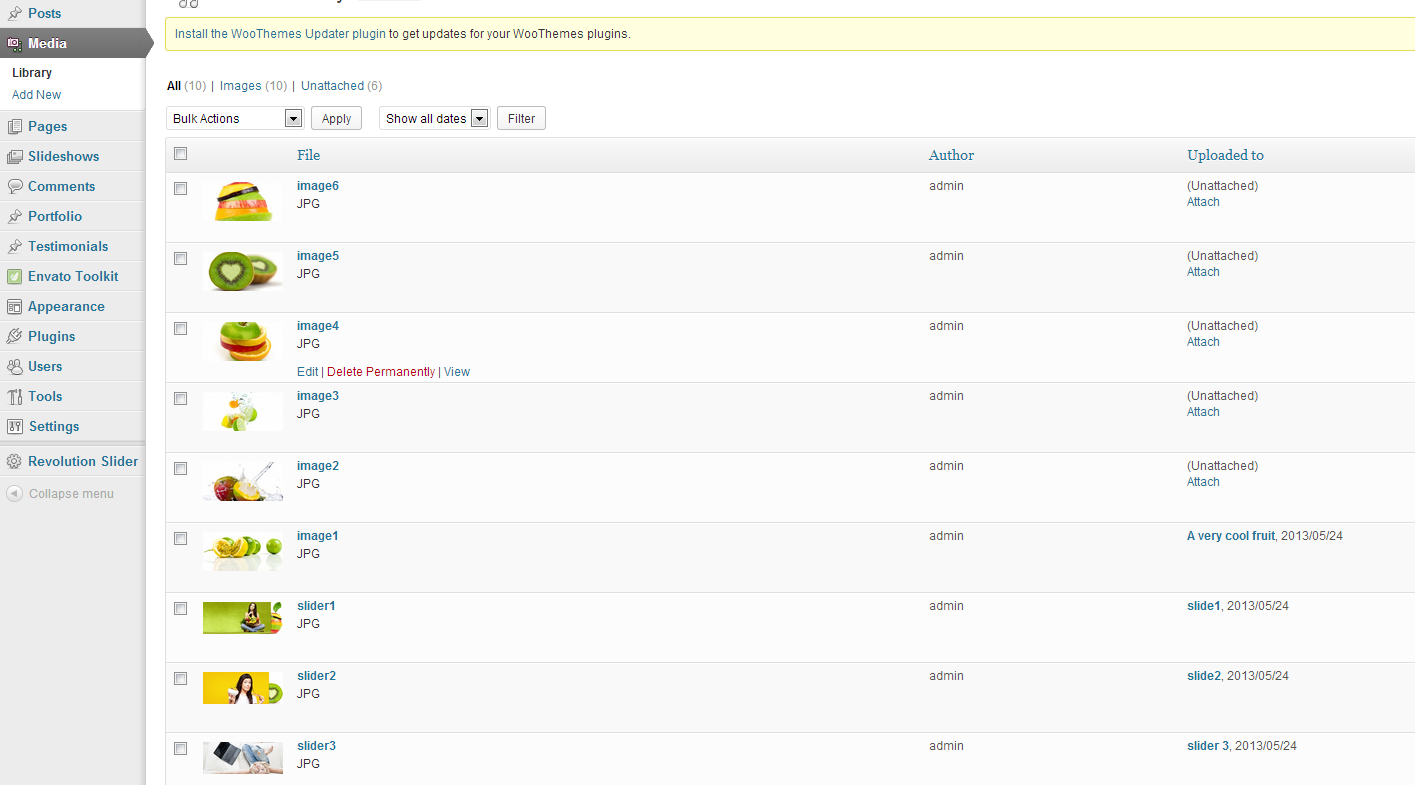
Image shows a Media Library of images, where you can see to which post an image belongs to. For example image1 is assigned to a post name A very cool fruit. Adding Portfolio Posts
Adding Portfolio posts is the same as adding Blog posts, the only difference is that you do not add the posts under Posts, but under Porfolio.
Widgets
We included 8 custom widgets: Images (good for adding an image to your footer), Quotes, Photostream, Twitter, Recent Blog Posts, Recent Photos, Brankic Social Media Widget and Recent/Popular/Comment box. We also styled the default ones.
You can add widget in Appearance → Widgets by drag and dropping in the Sidebar box.
Once you have added a widget to the Sidebar box the widget will open and extra fields will appear.
More information on widgets.
Shortcodes
Shortcodes are small text snippets that get converted by WordPress. As an example:
Using shortcodes is very easy. To use one, create a new post (or edit an existing one), and in the the editor type a shortcode in brackets, such as:
[quote] This is a pull-quote. [/quote]
The theme comes with quite a few shortcodes that are easily accessible thanks to a visual self-explanatory user interface that is accessible by clicking the Shortcodes button when you write a post or a page. Most shortcodes require you to enter additional information and then get generated by the theme on its own. You can also choose to nest various shortcodes.
Attention: Please make sure to always start new shortcodes on new lines. Most of the time you wont encounter any errors if you don't do that but unfortunately WordPress does mess up the HTML sometimes.
Click here to see our shortcodes in action.
Banner grid
[banner_grid_wrapper theme="dark"]
[banner_grid link="#" size="full" image="http://anpsthemes.com/shopbox/wp-content/uploads/2014/01/dresses_grid.jpg"][/banner_grid]
[banner_grid link="#" image="http://anpsthemes.com/shopbox/wp-content/uploads/2014/01/stylish_grid.jpg"][/banner_grid]
[/banner_grid_wrapper]
Parameters:
- theme - changes the background color. If set to dark the background will change to a dark color.
- link - link URL.
- size - can be set to either full or half.
- image - background image URL.
YouTube
[youtube hide_video="false"]IG0wyXUcqZI[/youtube]
Displays a video from YouTube. You only need to insert the video ID, not the entire URL. You can set the hide_video attribute to true if you don't want the video to be displayed in the content.
Vimeo
[vimeo hide_video="false"]46106724[/vimeo]
Displays a video from Vimeo. You only need to insert the video ID, not the entire URL. You can set the hide_video attribute to true if you don't want the video to be displayed in the content.
Breadcrumbs
[breadcrumbs /]
Displays the breadcrumbs of the current page/post.
Google maps
[google_maps zoom="16" height="500" layout="full-width" icon="map_pin.png"]Ljubljana[/google_maps]
Parameters:
- zoom - defines the zoom level of the map, which determines the magnification level of the map. This parameter takes a numerical value corresponding to the zoom level of the region desired.
- height - this sets the height of the map. The parameter takes a numeric value, defined in pixels.
- layout - by default Google Maps will have a boxed layout (the maps will be as larger as the content area), but you can also make maps full width (have the width of the entire browser window) by setting the layout attribute to full-width.
- icon - add an image URL to change the default pin icon
Button
[button size="large" style="style1" link="http://anpsthemes.com/shopbox/" target="_blank"]Button text[/button]
Parameters:
- size - determines the size of the button. It can be set to small, medium or large.
- style - can be set to either style1 (default value), style2 or style 3.
- link - the target location of the button. The link must contain a http:// protocol, when linking to other sites.
- target - specifies where to open the link. Can be set to _blank, _self, _parent or _top (read more about this values).
Custom button
This is not a new shortcode, but just a variation of the [button] shortcode with which you can also set the background color and font color of a button.
[button size="medium" background="#dadada" color="#666" link="http://anpsthemes.com/shopbox/" target="_blank"]Purchase[/button]
Additional Button Parameters:
- background - control the button background color.
- color - text color of the button.
Contact form
[contact success="Your message has been successfully sent!"][/contact]
Parameters:
- success - The message that will appear, once the user has submited the contact form.
Quote
[quote sub="mulstipurpose wordpress theme that will fit your every need"]SHARE ANPSTHEMES VIEW OF THE VISION WITH NEW THEME SHOPBOX[/quote]
Parameters:
- sub - text to be displayed under the main text.
Note: You can also wrap the main text into strong and em tags to hightlight the text.
Icon
[icon style="secondary" position="left" icon="heart" title="Icon align right" link="#"]Mauris et rhoncus tellus. Aenean dapibus, enim id mattis pulvinar, erat quam vehicula lacus, ac tristique nisi tellus nec diam.[/icon]
Parameters:
- style - can be set to either primary (default value) or secondary. This will change the icon background color.
- position - can best set to top (default value), left and right. This will change the position of the icon.
- title - title displayed bellow the icon.
- icon - select one of the included bootstrap icons. See full list here.
- link - the target location of the icon. The link must contain a http:// protocol, when linking to other sites.
- target - specifies where to open the link. Can be set to _blank, _self, _parent or _top (read more about this values).
Icon Group
[icon_group]
Column layout
[content_half id="first"]1/2[/content_half]
[content_half id="last"]1/2[/content_half]

[content_third id="first"]1/3[/content_third]
[content_two_third id="last"]2/3[/content_two_third]

[content_quarter id="first"]1/4[/content_quarter]
[content_two_quarter]2/4[/content_two_quarter]
[content_quarter id="last"]1/4[/content_quarter]
Parameters:
- id - you need to assign the first and last column
Progress bar
[progress percentage="90"]HTML[/progress]
Parameters:
- percentage - defines the progress bar size. It takes a number from 0 to 100.
- style - can be set to primary, secondary, danger or warning. This controls the progress bar color.
Person
[person name="John doe" picture="..." title="Developer" facebook="astudioface" twitter="" linkedin="" google=""]Lorem ipsum dolor sit amet, consectetur adipiscing elit.[/person]
Parameters:
- name - name of the person.
- picture - url path to the image. The url must contain a http:// protocol, when linking to other sites.
- title - this will show new to the name (smaller font). It can be used to show person status, title etc.
- facebook / twitter / linkedin / google - social media that will display below the image. Must contain a full link, not just profile name.
Alert
[alert type="success"]Succes! Your message goes here[/alert]
Parameters:
- type - can be set to either success, info, warning or danger.
404 Error Message
[error_404 before="Sorry!" after="Page doesn’t exist or some other error occured."]404 Page not found[/error_404]
Parameters:
- before - the text that will appear before the main 404 text.
- after - the text that will appear after the main 404 text.
List
[list type=""]
[list_item]Item 1[/list_item]
[list_item]Item 2[/list_item]
[list_item]Item 3[/list_item]
[/list]
Parameters:
- type - can be set to either number, circle, square or arrow.
Accordion
[accordion opened="false"]
[accordion_item title="TITLE"]Lorem ipsum dolor sit amet, consectetur adipiscing elit. Integer dolor nunc, consequat sit amet feugiat quis, lorem ipsum Lorem ipsum dolor sit amet, consectetur adipiscing elit. Integer dolor nunc, consequat sit amet feugiat quis, lorem ipsum Lorem ipsum dolor sit amet.[/accordion_item]

[accordion_item title="TITLE"]Lorem ipsum dolor sit amet, consectetur adipiscing elit. Integer dolor nunc, consequat sit amet feugiat quis, lorem ipsum Lorem ipsum dolor sit amet, consectetur adipiscing elit. Integer dolor nunc, consequat sit amet feugiat quis, lorem ipsum Lorem ipsum dolor sit amet.[/accordion_item]
[/accordion]
Parameters:
- opened - can be set to true or false.
Tabs
[tabs]
[tab title="Title 1"]Tab content 1[/tab]
[tab title="Title 2"]Tab content 2[/tab]
[tab title="Title 3"]Tab content 3[/tab]
[/tabs]
Parameters:
- tab1 - tab6 - titles of the tabs.
Pricing table
[pricing_column featured="false"]
[pricing_price title="PRICE NUMBER 1"]0 €[/pricing_price]
[pricing_row]per month[/pricing_row]
[pricing_row]1 GB storage[/pricing_row]
[pricing_row]Protected[/pricing_row]
[pricing_row]Real time support[/pricing_row]
[pricing_row]Unlimited bandwith[/pricing_row]
[pricing_row]Unlimited databases[/pricing_row]
[pricing_footer link="LINK"]PURCHASE[/pricing_footer]
[/pricing_column]
To set up a pricing table, you first need to call the [pricing_table][/pricing_table] shortcode, then inside of it you add as many [pricing_column][/pricing_column] shortcodes as you like (1-5). This will create the pricing table columns. You can assign a column to be more visible with the featured="true" attribute.
Inside the columns you can add [pricing_price][/pricing_price] shortcode, which will display the price; as many [pricing_row][/pricing_row] shortcodes as you like - this shortcode defines a row and can contain text; [pricing_footer][/pricing_footer] which shows a button.
Logo Box
[logo_box carousel="false"]
[logo link="URL" target="_blank"]1.png[/logo]
[logo link="URL" target="_blank"]2.png[/logo]
[logo link="URL" target="_blank"]3.png[/logo]
[logo link="URL" target="_blank"]4.png[/logo]
[/logo_box]
Parameters:
- carousel - can be set to true or false. If set to false, once there are more than 4 logos added, the logos will be stacked below. If it is set to true, the logos will be added in a carousel, so that the logos will be placed in a single line.
This shortcode is used for displaying company shortcodes.
Mark
[mark style="secondary"]Lorem ipsum dolor sit amet, consectetur adipisicing elit. Atque, sequi?[/mark]
Parameters:
- style - can be set to either primary (default value) or secondary. This will change the background color.
Tooltip
[tooltip text="Tooltip text" position="bottom"]Text[/tooltip]
Parameters:
- text - that that will shown in the tooltip bubble.
- position - position of the tooltip hover bubble. Can be set to top (default value), bottom, left and right.
Carousel
To add a carousel, you first need to add the [carousel] shortcode which can contain the background and full width attributes.
Inside of the [carousel] you add [carousel_slide] shortcodes which can contain any HTML elements. We reccomend using h1 and h2 headings for your titles.
[carousel background="hcarousel_back.png" full_width="true"]
[carousel_slide]
<h1>Lorem ipsum dolor sit</h1>
<h2>Lorem ipsum dolor</h2>
<img class="alignnone size-full wp-image-104" alt="carousel_inner" src="carousel.png" width="646" height="309" />
[/carousel_slide]

[carousel_slide]
<h1>Lorem ipsum dolor sit</h1>
<h2>Lorem ipsum dolor</h2>
<img class="alignnone size-full wp-image-104" alt="carousel_inner" src="carousel2.png" width="646" height="309" />
[/carousel_slide]

[carousel_slide]
<h1>Lorem ipsum dolor sit</h1>
<h2>Lorem ipsum dolor</h2>
<img class="alignnone size-full wp-image-104" alt="carousel_inner" src="carousel3.png" width="646" height="309" />
[/carousel_slide]

[/carousel]
Parameters:
- background - background of the entire carousel.
- full_width - can be set to either true or false (default value). If set to true, the carousel background will span the entire page width.
Statement box
[statement_box theme="dark" position="bottom"]Text[/statement_box]
Parameters:
- theme - can be set to default or dark. This will change the stlye of the statement box.
Color
[color style="secondary"]This text is colored differently[/color]
Parameters:
- style - can be set to either primary (default value) or secondary. This will change the text color.
Code
[code]Html code goes here[/code]
Heading
[heading background="#00c090" color="#fff"]Buttons[/heading]
Parameters:
- background - by default the background color will be the same as the primary color, but using this parameter you can set a custom color.
- color - text color.
Popover
[popover name="popover-1" text="Link text" style="link"]Inner Text[/popover]
Parameters:
- name - you must select a unique name of your popover.
- text - text of the link/button.
- style - can be set to either link or button.
Table
[table]

[table_row]
[table_cell heading="true"]ID[/table_cell][table_cell heading="true"]Name[/table_cell][table_cell heading="true"]Template[/table_cell]
[/table_row]

[table_row]
[table_cell]0[/table_cell][table_cell]AnpsThemes[/table_cell][table_cell]WideBox[/table_cell]
[/table_row]

[/table]
Parameters:
- headings - can be set to true. This will turn a table cell into a table heading.
FAQ
You first need to add a [faq] shortcode and then inside it add [faq_item] shortcodes.
[faq]
[faq_item question="Lorem ipsum dolor."]Lorem ipsum doloum eros vulputate placerat sed non enim. Pellentesque eget.[/faq_item]
[/faq]
Parameters:
- question - question of a single FAQ element.
Posts
[posts columns="5" orderby="date" order="DESC"]5[/posts]
Parameters:
- columns - number of columns of the posts. Can be set to 2, 3, 4 and 5.
- orderby - set a specific value on which your posts will be order by. You can set it to date, title, ID or rand.
- order - can be set to either ASC or DESC.
Featured Posts
[featured_posts theme="dark" columns="5" orderby="date" order="DESC"]5[/featured_posts]
Parameters:
- theme - can be set to either default or dark.
- columns - number of columns of the posts. Can be set to 2, 3, 4 and 5.
- orderby - set a specific value on which your posts will be order by. You can set it to date, title, ID or rand.
- order - can be set to either ASC or DESC.
Featured Projects
[featured_projects theme="dark" columns="5" orderby="date" order="DESC"]5[/featured_projects]
Parameters:
- theme - can be set to either default or dark.
- category_name - show only certain categories (filter using their names).
- category_id - show only certain categories (filter using their ids).
- orderby - set a specific value on which your posts will be order by. You can set it to date, title, ID or rand.
- order - can be set to either ASC or DESC.
Adding sidebars
Sidebar generator
Before you can start adding widgets you need to create a new sidebar, but you can add widgets to the already added ones, but you can create how many new sidebars you like. You can find the sidebar generator under Appearance → Sidebars.
Adding a sidebar to a page or post
You can add a sidebar to all pages, except the portfolio page and single item portfolio page. You can add a sidebar to a page/post by selecting the desired by going to the desired item in WordPress (under Pages/Posts) and under the content editor you will see a box called Sidebars. You can select eiter only one of the sidebars, either both of them.
Important: Be carefull when adding two sidebars, because some elements aren't designed to be used with two sidebars ( two or more column sidebars ).
Translating the Theme
Our theme comes localisation ready out of the box – all that’s needed is your translation.
There are several methods to create a translation, most of which are outlined in the codex (http://codex.wordpress.org/Translating_WordPress), however, we find the easiest method is to use a plugin called codestyling localisation.
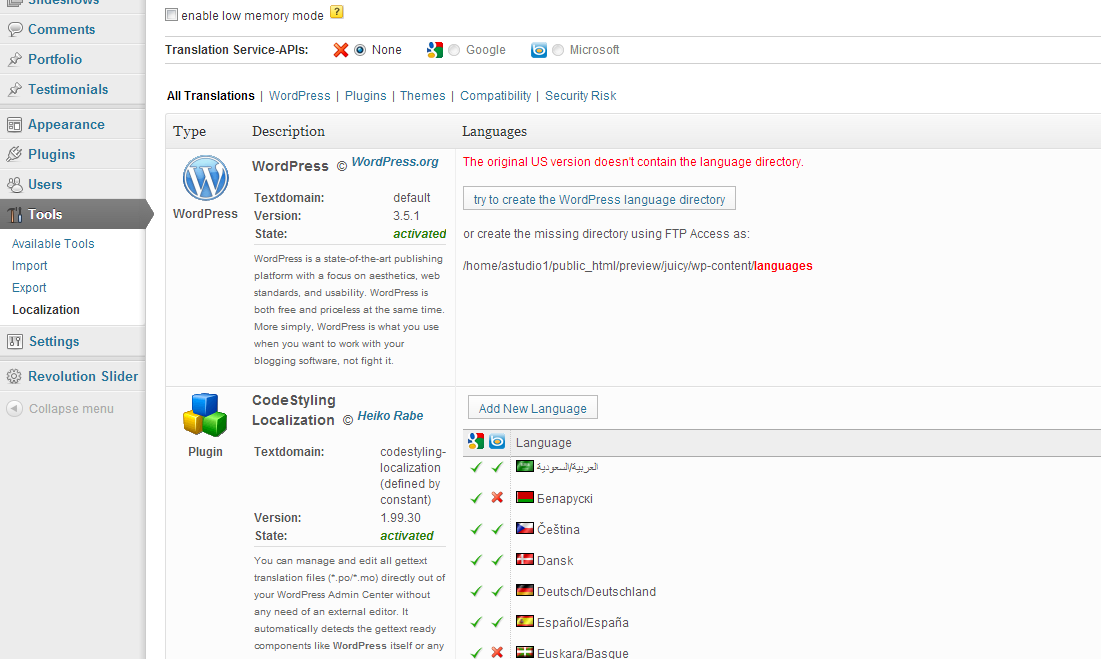
We find the easiest method is to use Codestyling localisation. Updating the Theme
Before you update:
Go to our ThemeForest item page and see all of the changes in the change log. Here you will also find if there are any problems if you update / what you have to do.
Save all of your changes files, ie. the custom.css file (you don't need to worry if you are using a child theme).How to update
To update our theme, go to ThemeForest and download the newest version of our theme (you can check all of your purchased items under the Downloads tab). Unzip the .zip files until you get the cleanway folder, then go to your server and place the files under wp-content/themes/.
Please note: our theme cannot be updated via WordPress, so if you are promted to update the theme, please do not click on the update, as you may lose your files.
LayerSlider
The official documentation can be found here.
This site contains many tutorials (FAQ) on this plugin: http://support.kreaturamedia.com/faq/
Child Theme
A WordPress child theme is a theme that inherits the functionality of another theme, called the parent theme, and allows you to modify, or add to, the functionality of that parent theme. The whole idea of a child theme is that you can modify, and add to the functionality of that parent theme without modifying it directly. The parent remains intact, everything is built within the child theme.
Reasons to use child theme:
- Easy updates - If you’re using a child theme, you don’t have to worry about any updates. Whenever you update the theme, only the parent theme will be updated. Your child theme, and everything you’ve coded in it, remains intact.
- Changes - If you’re using a child theme, every modification can be found in the child theme’s folder and thus you can track all the changes you made very easily. To start using our child theme, then just activate the
Footer
You can set up the footer in the same part as Widgets, Appearance → Widgets. The only difference is you don't drag and drop in the sidebar boxes, but you add them in 4 different columns. In each column you can add what you like, as the widgets look different in the footer than in the sidebars.
Adding links to footer
First thing you will need to do is go to Menus where you need to create new menus with all of the links.
Now you are ready to start showing the added links in your footer, just find the Custom Menu widget and add it to the desired Footer Column.
When the widgets open you will be able to set the title and select a menu which should be displayed.
Advanced Options
Twitter Bootstrap
Our theme has been created with the Twitter Bootstrap CSS framework, which means you can use all of its features when writing your code in our theme. This means if you know how to use Twitter Bootstrap, you know how to change / adapt our theme and create new features or even use the features we have not shown on our demo site.
More details on Twitter Bootstrap.
LESS
Bootstrap is made with LESS at its core, a dynamic stylesheet language created by Alexis Sellier. It makes developing systems-based CSS faster, easier, and more fun.
We already compiled the LESS code into CSS, so you can choose to either develop your code in CSS or take a look at our LESS files and then compile it yourself into CSS.
In the bootstrap folder you will find all of the default Bootstrap LESS files, plus our own:
- style.less - this is the core LESS file of our theme. You will need to compile this file in order to get the new CSS code.
- shortcodes.less
- widgets.less
- footer.less
- header.less
- pretty_photo.less
- theme_variables.less
- wordpress_core.less
See the Bootstrap LESS features.
Adding New Features
If you are going to add many new features, please look at child themes, as you will still be able to update our theme without loosing any of you changes.
Also please take advantage of the Bootstrap and LESS features, as it could save you quite a lot of time.
Sources and Credits